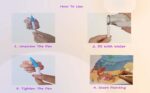
How to use:
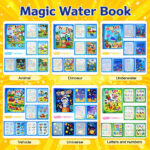
Magic Water Book provide artists with a convenient and versatile tool for expressing creativity on various surfaces. Their ease of use and portability make them a favorite among both beginners and experienced artists. However, mastering the process of using a Magic Water Book effectively requires attention to detail and a systematic approach. This essay outlines a step-by-step guide on how to utilize a Magic Water Book from unscrewing the pen to starting your painting.
1. Unscrew the Pen: The first step in utilizing a Magic Water Book is to unscrew its components. Most Magic Water Book come with a detachable barrel, revealing the ink cartridge inside. To unscrew the pen, gently hold the barrel in one hand and twist the cap counterclockwise with the other. Take care not to apply excessive force, as this may damage the pen or its components. Once the cap is removed, set it aside in a safe place to avoid misplacement.
2. Fill the Water: After unscrewing the pen, the next step is to fill it with water. Magic Water Book typically feature a reservoir or cartridge designed to hold water. To fill the pen, immerse the nib or tip into a container of clean water. Gently squeeze the barrel or press the button, depending on the pen’s design, to draw water into the reservoir. Be mindful not to overfill the pen, as this may cause leakage or affect the ink’s consistency. Once the reservoir is adequately filled, remove the pen from the water container and wipe off any excess moisture with a clean cloth or tissue.
3. Tighten the Pen: With the pen filled with water, it’s crucial to ensure all components are securely tightened before proceeding to paint. Reattach the cap or barrel by aligning the threads and twisting clockwise until snug. Take care not to overtighten, as this may strip the threads or cause damage to the pen. Check for any signs of leakage or loose fittings, and make adjustments as necessary to ensure a tight seal. A properly tightened pen will prevent water leakage and maintain consistent ink flow during the painting process.
4. Start Painting: Once the Magic Water Book is assembled and ready, it’s time to unleash your creativity and start painting. Hold the pen comfortably in your hand, ensuring a firm grip without exerting too much pressure. Experiment with different techniques, such as varying pressure, strokes, and blending, to achieve the desired effects on your chosen surface. Whether you’re sketching, outlining, or filling in areas with color, allow the Magic Water Book to glide smoothly across the paper or canvas, releasing a controlled flow of water and pigment. Take breaks to assess your progress, adjust the pen’s water level if necessary, and explore new approaches to enhance your artwork.


Reviews
Clear filtersThere are no reviews yet.